
Blue Burst Installation - Blue Burst setup
Prestart Checklist
- A Computer capable of running Blue Burst:
- 1.4Ghz+ Processor
- 1GB RAM
- AMD Radeon 9000+ series or nVidia 5000+ series or
Intel HD series Graphics card
- Blue Burst Installation files, available
here (mirror)
- Blue Burst patch files, available
here (mirror)
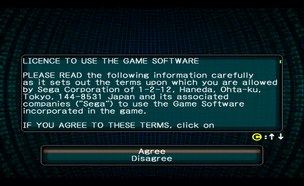
Step 1 (New Saves only):
Select Agree to
Accept the PSO License agreement
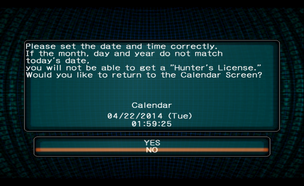
Step 2 (New Saves only):
Check the date and time is correct - If it's right, select No -
selecting Yes will take you to the Gamecube BIOS to set it
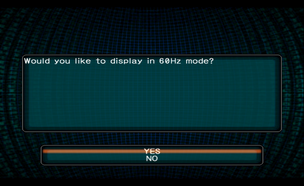
Step 3 (PAL disks only):
Select Yes to set the Game to Pal 60Hz mode
All TV's
and monitors bought since 2000 support 60Hz mode: 50Hz mode is supported, but
not recommended
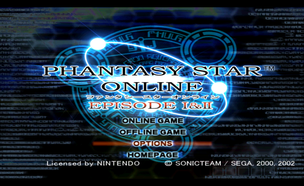
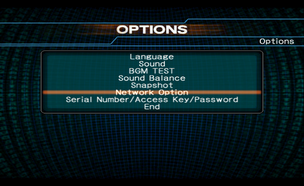
Step 4:
At the main screen, press start, then select Options
Step 5:
Select Network Options
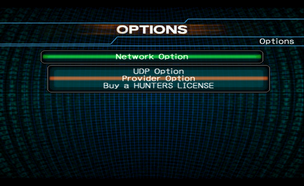
Step 6:
Select Provider Options
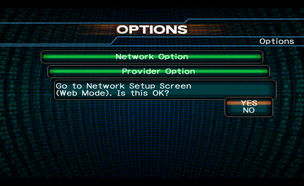
Step 7:
Select Yes to go to Network Setup
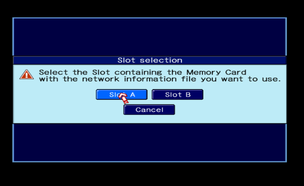
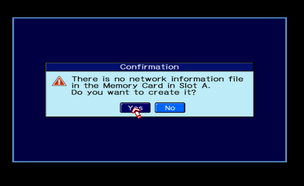
Step 8 (New Saves only):
Select Slot A to get the network information file
Step 9 (New Saves only):
Select Yes to create a network information file
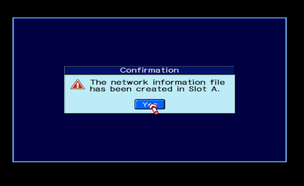
Step 10 (New Saves only):
Select Yes to confirm creation of a Network Information File
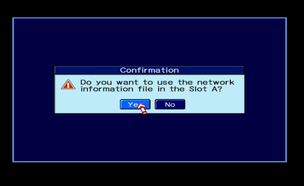
Step 11:
Select yes to confirm the use of Slot A's Network
Information File
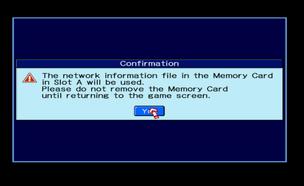
Step 12:
Select Yes to confirm the selection
Step 13:
Select Network Setup

Step 14:
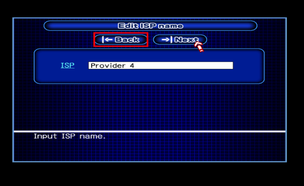
Select Provider 4 or Provider 5, then select
Edit
If you see Provider 1-3, you have a Gamecube Modem (DOL-012) installed, which
has not been tested

Step 15:
Select Next
You can rename the provider to what you like for clarity, but this is optional
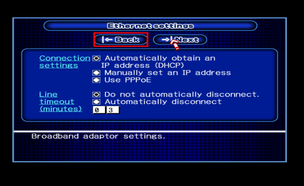
Step 16:
Leave the connection settings on Automatically obtain an IP address
(DHCP), Change the line Timeout to Do not automatically
disconnect, and select Next
Depending on your network settings, you may need to pick Manual or PPPoE: For
most novices, Automatic will do the job
The Automatic
disconnect time is how long you can "Idle" before being disconnected from the
server: This setting is optional, but recommended
Step 17:
Change the DNS server to Manual, enter the Primary DNS
as 137.117.229.87, and select Next

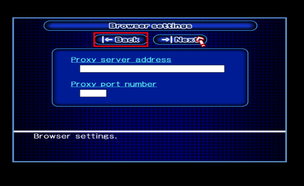
Step 18:
Leave the Proxy Server address Blank, and select Next
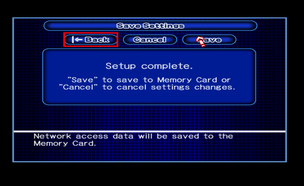
Step 19:
Select Save
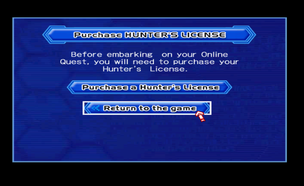
Step 20:
Select Return to the game
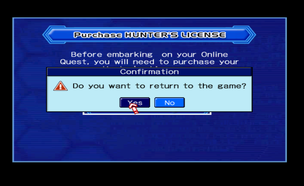
Step 21:
Select yes to Confirm exit
Gamecube Setup - Gamecube Troubleshooting
Q: I'm having issues with the Broadband
Adaptor
A: Check the Quick Start guide (Nintendo.com)
(Mirror)
Q: I have a PAL Disk, but
I'm not getting prompted for 60Hz Mode
A: Hold down B on the control Pad while
turning on the Gamecube. Keep B pressed until the prompt appears.